

Soldering, also known as sweating, is a foundational skill in plumbing that opens the door to professional-quality copper piping repairs and installations. Heat is applied to a joint between two metal parts—typically copper pipes and fittings—allowing the filler metal to flow into the joint and creating a watertight seal.
Solder is an alloy of different metals, varying depending on the application. Traditionally, solder was made from lead; however, lead solders are no longer used for such applications due to the adverse effects of lead in potable water systems. Despite this, lead solder is still preferred in some areas.
Benefits of Soldered Joints vs. Alternatives
Soldered joints are compact, cost-effective, and ideal for tight spaces, providing a reliable, permanent connection without the need for expensive tools. While alternative technologies like push-to-connect fittings and press systems are popular, soldering offers greater control and durability when done properly.
This comprehensive project guide walks through the complete process of soldering copper pipes, including tools, prep, safety tips, solder choice and mistakes to avoid.
What You'll Need For This Project
- Copper pipe and fittings
- Pipe/tubing cutter
- Reaming tool or deburring accessory
- Sand cloth or abrasive mesh (Hercules® Waterproof Abrasive Sandcloth/ Hercules® Waterproof Abrasive Open Mesh Cloth)
- Fitting brush (Oatey® Heavy Duty Fitting Brushes)
- Acid brush (Oatey® Acid Brushes)
- Flux (No. 95 Tinning or H-20® Water-Soluble)
- Solder (Safe-Flo® or Oatey® Silver Lead Free Plumbing Wire Solder for potable systems)
- Propane or MAPP gas torch with correct tip size
- Flame protector (Oatey® Flame Protector)
- Heat-resistant gloves and safety goggles
- Fire extinguisher
- Dry and damp rags
- Optional: Spray bottle, wet rag (for tight spaces)
New to soldering? Read: Soldering 101 - Soldering Tools, Tips & Techniques
Step 1. Cut and Deburr the Pipe
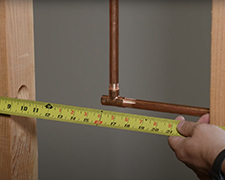
First, measure the copper pipe to the desired length and cut using a tube cutter. Make sure the pipe is cut square.
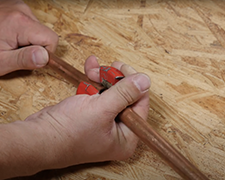
Position the cutter around the tube, ensuring the cutting wheel is aligned with your mark. Hand-tighten the cutter gently, avoiding going too tight initially, to prevent flaring or burrs.
Once it’s snug, give it a slight quarter turn. Begin rotating the cutter around the tube, making one or two full rotations before tightening another quarter turn. Repeat this process until the cutter fully penetrates the tube.
After cutting:
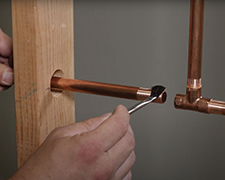
- Deburr the inside of the pipe with a reaming tool or deburring attachment. This removes internal burrs that can cause flow restriction, cavitation, or trapped debris over time.
- Avoid excess pressure; light, even strokes are sufficient. Many tubing cutters include a fold-out deburring tool.
Pro Tip: Choose a cutter sized appropriately for your pipe. Large cutters on small-diameter pipe can cause tracking or misalignment.
Step 2. Clean the Pipe and Fitting
Clean the pipe's exterior with sand cloth or abrasive mesh. For the fitting interior, use a fitting brush of matching size.

Your goal:
- Remove oxidation and contaminants.
- Roughen the surface to help the solder bond effectively.
- Avoid touching cleaned surfaces with bare hands, as oil can hinder solder flow.
Remember, regardless of the numerous products available for pipe cleaning, they all serve a similar purpose: to abrade and prepare the surfaces. Whether using emery pads, sand cloth, or specialized tools, the key is personal preference and finding the best method for you.
Step 3. Apply Flux
Flux plays a critical role in making a clean, leak-free solder joint by acting as a wetting agent. It helps solder flow evenly into the joint while preventing oxidation as the metal heats up. Without it, the solder won’t bond properly. However, when it comes to application, more is not better.
- Use an acid brush to apply a thin, even layer of flux to both the outside of the pipe and the inside of the fitting. Avoid slathering it on, as excess flux doesn’t improve the joint and will likely cause messy, uneven solder runs. Remove any excess flux.
- Once flux has been applied, avoid handling the prepped surfaces with bare hands. The oils from your skin can interfere with solder flow and compromise the integrity of the joint. Wearing gloves during this step is strongly recommended.
-
- Water-Soluble Flux (like Oatey® H-20®): Easier to flush after soldering and great for potable systems.
- Tinning Flux (like Oatey® No. 95): This product contains powdered solder to assist with filling large joints or when working with less experience. It can also help compensate for less-than-perfect heat control.
Pro Tip: Even seasoned plumbers use tinning flux—it’s versatile, forgiving, and ideal for larger pipe sizes or tricky jobs.
Step 4. Assemble the Joint
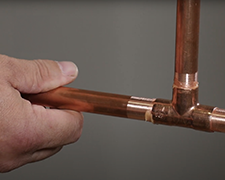
- Insert the pipe fully into the fitting with a slight twist to distribute the flux evenly. Confirm full insertion and alignment before heating
- Don't disturb the joint once assembled. This can compromise the flux layer and solder path.
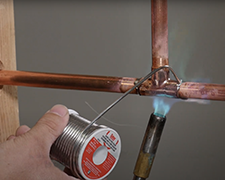
Step 5. Heat the Joint and Apply Solder
Torch tips come in different sizes for a reason. Use a smaller tip for pipes 1 inch and under, and switch to a medium or large tip for bigger diameters.
A larger tip delivers more heat across a wider area, which is critical for larger pipe sizes. An oversized tip on a small pipe can overheat the joint and burn off the flux, causing the solder to fail.
Using a properly sized torch tip:
- Hold the torch at roughly a 45° angle and apply the flame to the fitting side of the joint, not the pipe.
- Focus on heating the entire joint evenly. Start at the base of the fitting and work around it. For larger joints, apply heat to both sides to ensure complete flow.
Once the joint is hot enough, touch the solder to the opposite side of the flame. If everything’s properly prepped, the solder should melt on contact and be drawn into the joint by capillary action. Then rotate and apply solder to the other side.
Don’t overdo it:
A general rule of thumb is that you only need a length of solder equal to the diameter of the pipe:
- ½-inch pipe = ½-inch solder
- ¾-inch pipe = ¾-inch solder
- 1-inch pipe = 1-inch solder
More than that is typically waste—it drips, scorches, or ends up on the floor. Excess solder won’t improve the seal and could indicate an underlying issue with cleaning or flux application.
Watch for proper flow:
If the solder flows cleanly and fills the joint, it will “disappear” into the fitting and not run off. If it melts and drops straight down, the joint likely wasn't cleaned or fluxed correctly, or the temperature is uneven.
Pro Tip: Always shield nearby surfaces or components with a flame protector. In confined areas, pre-dampen nearby wood or insulation. Take 20 seconds to visualize your work area. Think to yourself, “If I put the flame this way, am I risking any nearby surfaces?” This will help you avoid accidents and burns.
Step 6. Wipe and Cool
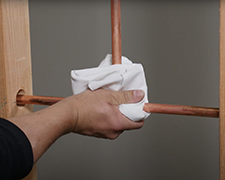
After soldering, the joint will still be hot—this is your window to finish the job cleanly and safely.
- Use a damp rag to remove excess flux and solder while the joint is still hot (but not molten). This helps prevent corrosion and removes the acidic flux residue that, if left behind, can create the greenish patina you often see on old copper. Beyond corrosion, leftover flux just looks sloppy.
- Go over the joint again with a dry cloth for a clean, residue-free finish. Some pros feel that a damp rag alone may leave behind traces of flux, so this second wipe helps ensure the surface is truly clean.
- You can let the joint cool naturally, but if you’re continuing work or handling the pipe shortly after, gently cooling it with a damp rag can speed things up. Just don’t shock it with cold water immediately—wait a few seconds first. This protects the integrity of the joint and helps prevent burns.
- Optional Finishing Touch: If you’re particular about appearance, lightly polish the pipe and fitting with sand cloth once cool. Heating causes discoloration, which doesn’t affect function but can be cleaned up for a more professional look.
Pro Tip: Keep a rag bucket nearby while soldering. This simple habit pays off in both safety and presentation.
Step 7. Test for Leaks
Let the joint fully cool before testing.
- For DIY applications, turn on the water and visually inspect for leaks.
- For professionals or multi-joint systems, consider pressurizing with air first. This helps locate leaks early and avoids water contamination if rework is needed.
Pro Tip: Air testing lets you fix a bad joint by reheating and applying more flux and solder, which is not always possible after water has flowed through.
Soldering Safety Tips
Working with an open flame means taking safety seriously, especially in older homes or tight spaces. One quick mistake can cause burns or even a fire. Follow these best practices to keep your workspace safe and your joints clean.
Flame Safety Essentials
- Always wear proper PPE
- Heat-resistant gloves
- Safety goggles
- Long sleeves
- Closed-toe shoes
- Use a flame protector: Position a flame protector between the joint and any nearby framing, drywall, or insulation—especially when working in wall cavities or old homes. It shields against direct flame and radiant heat.
- Keep a fire extinguisher and spray bottle close: Always have a charged extinguisher on hand. A simple spray bottle with water is also an excellent tool—use it to lightly dampen surrounding materials or cool areas that might smolder out of sight.
- Double-check your surroundings: Before lighting the torch, scan for nearby flammable materials like paper-backed insulation, wood framing, or even plastic fixtures. After soldering, always do a thorough check for smoldering debris.
- Avoid soldering directly overhead: Hot solder drips fast—and it burns. Always work from the side when soldering above your head, and plan your sequence so you don’t have to reach over freshly soldered joints.
- Think before you heat: Take two extra seconds to mentally assess the angle of your flame. Are you aiming it at the joint—or accidentally at the wall behind it? Small adjustments make a big safety difference.
Pro Tip: In older homes or tight spaces, spray surrounding wood, joists, or insulation with water before applying heat. Even materials you can’t see can ignite from residual heat or smolder long after you leave the job site.
Choosing the Right Solder
Selecting the right solder depends entirely on your application. For any potable water application, choose a lead-free option like Oatey® Safe-Flo® or Oatey® 95/5. For larger pipes or thicker joints, Oatey® 97/3 offers a higher melting range and better flow for gap-filling.
Use rosin core solder like Oatey® Rosin Core Wire Solder for electrical work and acid core solder like Oatey® Acid Core Wire Solder for galvanized metal repairs—both feature built-in flux for easier use. Leaded solder may be allowed for HVAC systems, but always check local codes before proceeding.
This guide breaks down the different types of solder, their compositions, applications, and how to pick the right one.
Mistakes to Avoid
- Skipping surface prep: Failing to clean and deburr the pipe means solder won’t bondflow properly.
- Using the wrong flux or solder: Various types of solder and fluxes are suited to different applications, and not all solder and flux are safe for potable water applications.
- Overheating the joint: Excess heat burns off flux and scorches the pipe, stopping solder from flowing.
- Overapplying flux: Too much flux can lead to corrosion and wasted product.
- Not protecting surroundings: Unprotected framing or cabinetry can scorch or catch fire.
- Neglecting cleanup and inspection: Leftover flux corrodes pipes; untested joints can leak later.
Read this troubleshooting guide explaining how to avoid these mistakes for a clean, leak-free joint.
Advanced Applications
Working on a more advanced project?
- Brass fittings: Use a tinning flux (like Oatey® No. 95) and apply extra heat to ensure proper flow and bonding.
- Tight spaces: Plan your flame path carefully. Use flame protectors and wrap nearby components with wet rags to absorb excess heat.
- Overhead work: Never solder directly above yourself. Redirect the flame or reposition the joint to avoid burns from hot solder drips.
Recommended Products
Looking for the right tools and materials? Explore Oatey’s line of trusted soldering products:
Published on April 11, 2024
Frequently Asked Questions
-
What’s the difference between soldering and sweating copper pipe?
-
They’re the same process—“sweating” is a trade term for soldering.
-
-
How hot should my torch be?
-
Most solder melts between 360°F and 460°F. Aim for 500°F pipe surface temperature. Use the correct torch tip and gas (MAPP, propane, or acetylene).
-
-
What’s the best solder for potable water?
-
Always use lead-free solder, such as Oatey® Safe-Flo®.
-
-
Can I fix a leaking solder joint?
-
Not directly. You must cut out the joint, clean both surfaces, and re-solder. However, air testing allows you to fix a bad joint by reheating and applying more flux and solder, which is not always possible after water has flowed through.
-