

Installing a bathtub drain doesn’t have to be complicated. With Dearborn True Blue® PVC and ABS Bath Waste Full Kits, which eliminate the need for additional tools or screws, the process is actually quite simple.
The True Blue kit's versatility is highlighted by its ability to accommodate varying tub styles and thicknesses. Its unique overflow test plug serves dual purposes as a trim installation tool. Additionally, the locking drain gasket ensures stability during challenging installations, while the pre-installed, reusable quarter-turn test plug adds to the ease of use. Its innovative overflow gasket is made from a specialized foamed rubber material, offering superior compression and memory than traditional counterparts.
Availability in a variety of drain finishes to match existing bathroom fixtures and a variety of styles—uni-lift, touch toe, and push n’ pull—for aesthetic customization. Uniquely, True Blue also allows for convenient trim change-outs, negating the need for a second rough-in kit purchase for future projects to refresh the look of your bathroom.
In this guide, we’ll outline the easy steps for finishing your bathtub installation using True Blue. If you’re looking to install a freestanding tub drain, check out our project guide here.
What You'll Need For This Project
- Dearborn True Blue® PVC and ABS Bath Waste Full Kits
- Oatey Clear Cleaner
- Oatey All Purpose Primer (not for ABS drain kits)
- Oatey All Purpose Cement
- Oatey Silicone Sealant or Oatey Plumber’s Putty
- Screwdriver
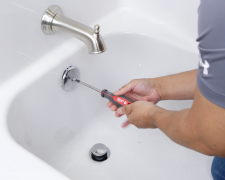
Step 1. Remove the Old Set Up
First, you'll need to uninstall the waste cover and the washer installed directly underneath the cover. You can do this using a screwdriver. Once you've removed these, make sure that the drain gasket is securely attached to the drain elbow, as this will be crucial for preventing leaks later on. After you've checked the drain gasket, take a moment to clean the area to ensure there's no debris that could interfere with your new installation.
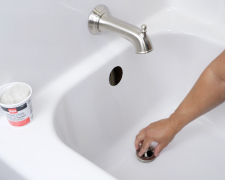
Step 2. Insert the Drain Spud
Note: Before you begin, check the box to make sure you have all the pieces you need. It's also important not to reuse any of the old components.
Next, apply Oatey silicone sealant or plumber’s putty to the bottom of the drain spud flange. Firmly press the drain spud into the tub drain opening.
Note: Plumber’s putty should never be used on ABS components.
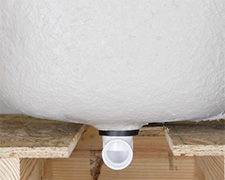
Step 3. Insert and Tighten the Drain Elbow
From the bottom of the tub, hand tighten the drain elbow onto the spud. Make sure the elbow outlet is facing out and away from the tub once tightened.
Step 4. Insert the Overflow Elbow
Ensure the blue overflow gasket is pre-assembled onto the overflow elbow. Insert the overflow elbow through the tub overflow opening.
Once it's in place, hand tighten the overflow elbow with the threaded overflow lock nut.
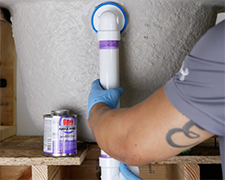
Step 5. Connect the Pipes
In this step, you'll need to measure and cut the overflow and drain pipe to the desired length. Chamfer and deburr the cut ends.
Dry fit the pipes to the elbows and sanitary tee to ensure proper fit. Apply an approved cleaner, primer, and cement, then let it cure.
Note: Primer should never be used on ABS components.
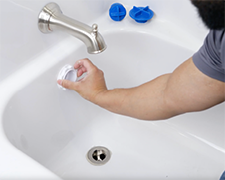
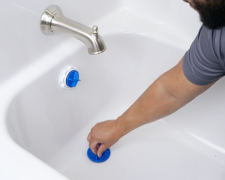
Step 6. Test for Leaks
Finish tightening the drain spud and overflow lock nut in place.
Ensure the test plus is pre-installed into the overflow elbow.
Fill the tub above the overflow inlet and confirm that all connections are watertight.
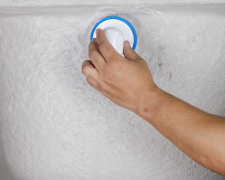
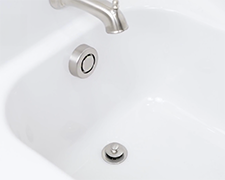
Step 7. Install Overflow Finish Faceplate
Once you've confirmed there are no leaks, remove all test plugs.
Finally, install the overflow finish faceplate by turning it clockwise onto the overflow elbow until it locks into place. Once the faceplate is secure, install the drain stopper onto the drain elbow, turning it until it's secure.
Document Downloads (2)
Published on March 22, 2024