

Toilet removal may seem daunting, but it is often an easier task than one may think. If you have noticed a leak around the base of your toilet, a persistent odor or wobbliness of the toilet, or even if you want to replace your entire toilet, this guide will walk you through the steps of a successful toilet removal and re-attachment.
For toilet installations, Oatey offers wax rings in regular and extra thickness; Johni-Bolts in sets of regular, extra-large and easy snap application; and accessories for flange repair, extension and more.
What You'll Need For This Project
• Liquilock
• Wrench
• Putty knife
• Fix-it Flange Repair Ring (AS NEEDED)
• Silicone sealant (AS NEEDED for flange repair)
• Set-Rite Toilet Flange Extension Kit (AS NEEDED)
• Screws (AS NEEDED for flange repair & extension)
• Toilet shims
• Utility knife
• Wax ring
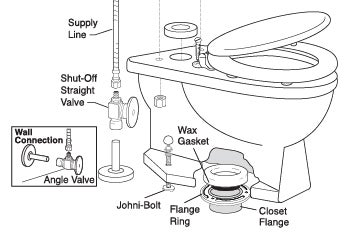
• Johni-Bolts
• Hacksaw
• Plumber’s caulk
• 3 in. End of Pipe Gripper Plug or Cherne 4 in. End of Pipe Gripper Plug
Step 1. Solidify Water in the Toilet
Start by turning off the water connection by rotating the knob on the water supply valve behind the toilet in a clockwise motion. Next, flush the toilet to drain the tank.
Tip: You will want to hold the toilet handle down so that as much water as possible drains from the tank and the bowl.
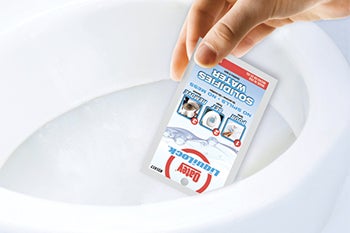
Sponge away any excess water using Oatey Liquilock to solidify the remaining water.
Measure the Liquidlock to the top thread of the cap and pour into the remaining water in the toilet. After at least 4 minutes, the water should be visibly transformed into a slush-like substance.
Next, disconnect the water supply tube from the toilet fill valve and the 3/8 inch compression nut. You are then free to remove the toilet confident that you will avoid any water spillage.
Tip: Click here for more information on Liquilock.
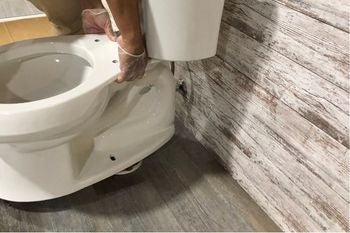
Step 2. Remove Toilet
Remove the caps covering the Johni-Bolts at the base of the toilet, as well as the nuts and washers. Use your utility knife to score away any existing caulk from around the base of the toilet bowl. Next, lightly rock the toilet side to side to break the wax and caulk seal. Finally, lift the toilet free from the floor.
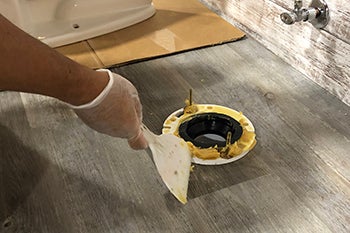
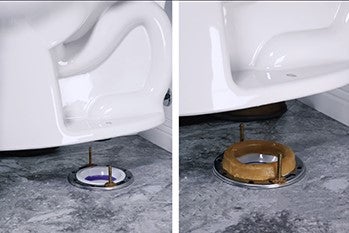
Step 3. Remove Existing Wax Ring
Remove large chunks of the wax ring to the best of your ability and, using a putty knife, scrape away old wax ring remnants that have adhered to the surface of the flange ring. With a damp paper towel or cloth, clean away any remaining residue from the ring.
Step 4. Assess Damage (as necessary)
Tip: Lightly stuff cloth, paper towels or a Cherne Gripper Plug into the open flange to prevent sewer gas from entering your home.
For a 3 in. pipe use a Cherne 3 in. End of Pipe Gripper Plug. When working with a 4 in. pipe, use Cherne 4 in. End of Pipe Gripper Plug.
With the toilet and wax ring out of the way, you should now be able to diagnose the issue behind any leaks or wobbliness of your toilet base.
• If the toilet flange is cracked or missing one or both slots that the toilet bolts slide into, go to step 5 to see how to apply an Oatey Fix-It Repair Ring to save yourself the time and hassle of replacing the entire closet flange and ring unit
• If new flooring has been installed and the flange is below the finished floor level, go to step 6 to install Oatey’s Set-Rite Flange Extender Kit to raise the flange to the correct height
• If you were looking to replace an old toilet, go to step 7 to start the re-attachment process
Don’t see any visible damage to the toilet flange, ring or inner pipe? If a leak persists onto lower floors or seems to be seeping into the subflooring, we suggest hiring a professional to diagnose any issues with the internal piping beneath the floor.
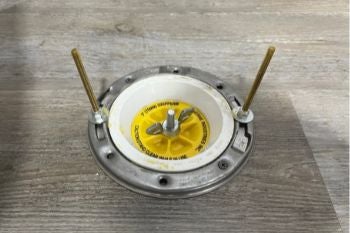
Step 5. Apply Fix-It Repair Ring (as necessary)
The Oatey Fix-It Repair Ring can be placed on top of a broken flange and includes 10 mounting holes for a wide range of installation options.
To start, line the rim with silicone sealant. Slide Johni-Bolts into any intact slots and press the replacement ring to the sealant. Screw the repair ring to the subfloor using the hole at each of the four corners before wiping away excess sealant. Finally, slide remaining bolts into the slots on the repair ring.
Tip: Watch the video to see the how it works!
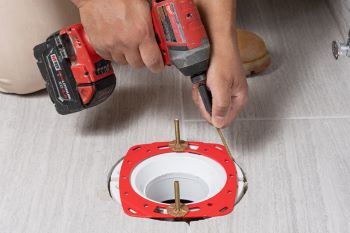
Step 6. Install Set-Rite Flange Extender (as necessary)
If new flooring has been installed and the flange is below the finished floor height, use the Oatey Set-Rite Flange Extender to raise the flange. The Set-Rite spacers come in sizes ranging from 1/8 to 3/4 in. and can reach a height of 2-¼ in. (the flange itself adds 5/8 in.).
Tip: The maximum offset from the flange to the top of the floor is 1-5/8 in.
First, measure the height from the existing toilet flange to the finished floor. Purchase an extension kit according to this measurement, as spacers can be stacked on top of each other to maximize height. When installing an extension kit, insert the foam rubber gasket first before arranging the spacers and flange on top. Finally, screw the flange into the subfloor.
Tip: Watch the video to see how it works!
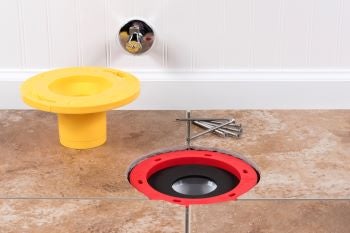
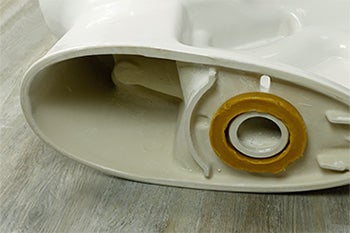
Step 7. Install New Wax Ring
Place the wax ring on the underside of the toilet bowl by either pressing it to the toilet’s outlet or setting it on top of the flange ring.

Step 8. Re-Install Toilet
Replace the toilet by lining up the Johni-Bolts with their holes on the toilet base. Press down and twist slightly (no rocking) to mesh wax seal to toilet and flange.
Tip: Make sure you hold the toilet as level as possible when placing it into place. The toilet tank should be parallel to the wall behind it. If the bowl isn't level, use toilet shims.
Step 9. Secure Johni-Bolts
Screw and tighten any washers and nuts onto the Johni-Bolts before placing bolt caps on top. If a bolt is too tall to fit under the cap, cut with a hacksaw.
Tip: Be careful not to overtighten the bolts or you could damage or crack the toilet bowl.
Step 10. Test
Reconnect the water line to the tank and twist the knob counterclockwise to re-activate the water connection. Then, flush the toilet a couple of times to liquify the Liquilock in the toilet bowl. Test for leaks both underneath the floor (if applicable) and around the toilet bowl.
If there are no leaks, caulk around the seam between the toilet base and the floor with plumber’s caulk. Lightly wipe away excess residue with a paper towel.
For more information, check out Oatey’s blog post on the Five Best Practices When Installing a Toilet Flange.
Published on November 03, 2022