

The toilet flange is the critical connection between your toilet and the drain pipe. It anchors the toilet to the floor and ensures a watertight seal, using a wax or non-wax ring.
A cracked, rusted, or broken flange, or one that is too low or too high, can cause several problems, including leaks around the toilet base, unpleasant sewer odors, and a toilet that is unstable or rocks. If left unaddressed, these issues can also lead to damage to the flooring and subfloor. It's essential to keep the flange in good condition to avoid these complications.
This comprehensive project guide outlines the steps for inspecting, repairing, or replacing a toilet flange. It also provides advice on selecting repair products.
This guide focuses on repairing a flange. If you are looking for step-by-step instructions on how to install a new toilet flange, read: How to Install a Toilet Flange.
What You'll Need For This Project
- Oatey® Liquilock™ Water Absorbing Crystals
- Wrench
- Putty knife and caulk gun
- Tape measure
- Towel
- Repair product:
- Silicone sealant (AS NEEDED for flange repair)
- Screws (AS NEEDED for flange repair & extension)
- Toilet shims
- Utility knife
- Wax ring
- Johni-Bolts®
- Drill
- Hacksaw
- Plumber's caulk
Step 1. Turn off the water and remove the toilet.
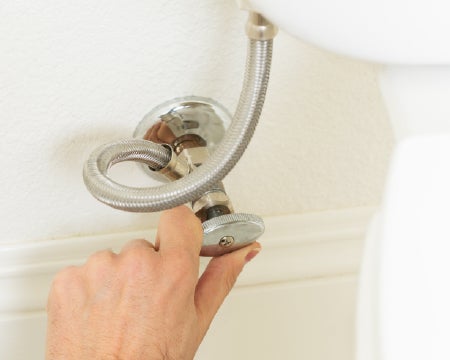
Start by turning off the water connection by rotating the knob on the water supply valve behind the toilet in a clockwise motion. Next, flush the toilet to drain the tank.
Pro Tip: You will want to hold the toilet handle down so that as much water as possible drains from the tank and the bowl.
Remove excess water using Oatey Liquilock to solidify the remaining water.
Measure the Liquidlock to the top thread of the cap and pour into the remaining water in the toilet. After at least 4 minutes, the water should be visibly transformed into a slush-like substance.
Next, disconnect the water supply tube from the toilet fill valve and the 3/8 inch compression nut. You are then free to remove the toilet confident that you will avoid any water spillage.
Pro Tip: Click here for more information on Liquilock.
Step 2. Inspect the flange.
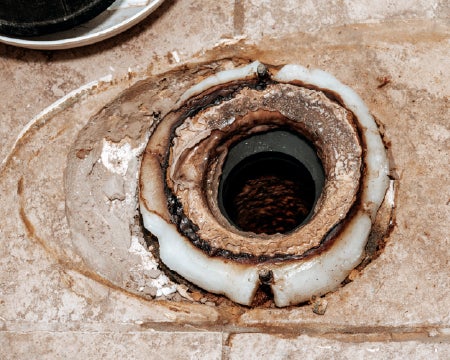
First, look for:
- Cracks or breaks in the ring
- Rust or corrosion (especially on metal flanges)
- Improper height (flange should sit on top of or level with the finished floor)
- Signs of water damage or prior leakage
Next, use a flashlight to inspect the inside of the pipe. If you're unsure, a visual inspection during a flush can help identify leaks. Finally, remove any broken or corroded sections of the flange.
Step 3. Determine the fix - repair, raise, or replace.
Oatey offers repair or replacement solutions for various toilet flange issues:
- If the flange or ring has minor damage, use an Oatey® Fix-it Flange Repair Ring.
- If the flange is below floor level, raise the flange height using Oatey® Set-Rite® Toilet Flange Spacers.
- If the flange is badly damaged or corroded, replace it entirely with a new flange.
Step 4. Choose the right toilet flange repair product
Choosing the right flange isn't a one-size-fits-all approach; it depends on the pipe material (PVC, ABS, or cast iron), connection method, floor height, and the application type (new installation, repair, or offset in tight spaces).
Here is a breakdown of repair and adjustment products:
| Product | Features |
|---|---|
| Twist-N-Set® Repair Flanges | Designed to replace broken closet flanges. Features a gasket that expands to fit inside service weight, heavy weight, and no-hub pipe. Installs easily without tools and provides a smooth, unrestricted flow design. |
| Oatey® Fix-it Flange Repair Ring | An easy solution for repairing broken or worn-out toilet-mounting flanges without replacement. Creates a secure connection between the floor and toilet, eliminating leak paths. Compatible with all floor types and flange heights. Elongated bolt slots prevent bending and allow post-installation adjustment. |
| Oatey® Closet Flange Spacer Kit | Used to build up existing closet flanges when new or replacement flooring leaves the flange below grade. |
| Oatey® Set-Rite® Toilet Flange Spacer Kit | A patented kit with four individual spacers to prevent leaks from improper double-stacking of wax. The only UPC-listed flange extension product for repairs and remodels. Spacers can be stacked to any height or snapped in half to support an existing flange. |
| Oatey® Metal Replacement Flange | Replaces rusted or corroded metal toilet flange rings. Made from galvanized steel for long-lasting durability and features a two-piece design for easy access. |
Read our Toilet Flange Selection Guide for more guidance and insight on selecting the right flange for your project.
Step 5. Clean the pipe and floor.
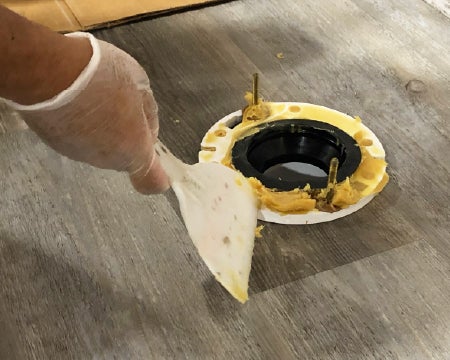
Scrape away old wax. Clean the pipe surface thoroughly. Vacuum or wipe debris from the floor around the opening.
Step 6. Install the repair product.
Once you have decided on your ideal repair solution, follow the installation instructions provided with the product.
If you are using a Fix It Repair Ring:
- Remove the broken or corroded portions of the existing flange.
- Apply a liberal amount of 100% silicone sealant to the remaining flange surface.
- Install new Johni-bolts (if existing bolt slots remain).
- Press and secure the repair ring to the subfloor in proper alignment.
- Fasten the bolts to the repair ring using the supplied hardware.
- Clean off any excess silicone and allow it to cure before reattaching the toilet.
If you are replacing a cast iron, PVC or ABS flange with the Twist-N-Set® Repair Flange:
- Remove the old flange.
- Thread the rubber gasket onto the flange until the gasket expands to meet the inside walls of the pipe.
- Tilt and twist the flange until the gasket begins to grip the pipe.
- Level and push the flange flush with the floor while using the closet bolts to complete the tightening process.
- Align the flange and screw it into place on the floor.
If you are correcting the flange height with the Oatey® Set-Rite® Toilet Flange Spacer Kit:
- Place the foam gasket on the existing flange surface. The existing flange must be without defects and properly secured to the subfloor.
- Next, determine the spacer size or combination of spacers required to correct the flange height. Spacers are offered in 1/8-, 1/4-, 1/2-, and 3/4-inch sizes. Place spacer(s) directly onto the foam gasket.
- Take the yellow flange extender and push down to seal within the foam gasket opening. Push down until it is correctly seated on top of the red spacer(s).
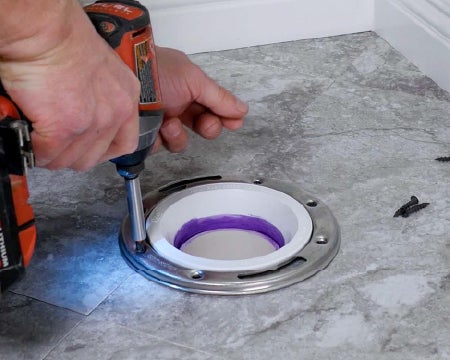
- Ensure Johni-Bolt slots are aligned for proper toilet bowl installation. Use six self-tapping stainless steel screws to fasten the extender, spacer(s), and gasket to the subfloor using a power drill driver.
- Install Johni-Bolts® in slots (sold separately).
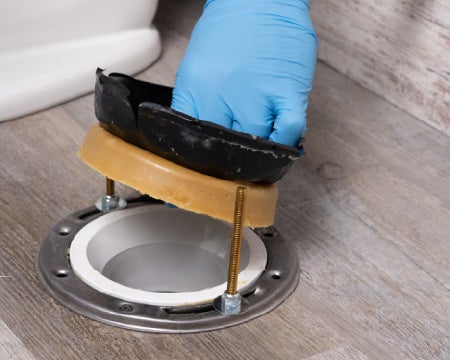
Step 7. Reinstall the toilet with a new seal.
Place a standard wax ring (sold separately) onto the repair ring, flange, or flange extender, which will become the new sealing surface for the toilet bowl installation. Never reuse an old ring.
Different types of wax rings and seals exist to accommodate various toilet and flange configurations. It is important to choose the right one to ensure a secure, leak-free installation. Learn more: Oatey 101: Wax Rings.
Align and lower the toilet carefully, compressing the seal to ensure a secure fit. Tighten the bolts evenly. Reconnect the water supply and test for leaks.
When to Use an Offset Toilet Flange
Offset flanges shift the toilet connection up to two inches in any direction, which is ideal when:
- Rough-in distance is off (e.g., 10 inches instead of 12 inches)
- Obstructions like joists or ducts are in the way
- You're retrofitting over concrete.
Pro Tip: When using offset flanges, dry-fit and mark your alignment. Offset models are not adjustable after they are solvent-cemented.
To learn more about offset flanges, read: Should I Use an Offset Toilet Flange?
Published on August 28, 2023
Frequently Asked Questions
-
How do I know if my toilet flange needs to be replaced?
-
Check for visible cracks, corrosion, or signs of leaks at the base. Pulling the toilet is usually necessary for a full inspection.
-
-
Can I repair a broken flange without removing the toilet?
-
No. The flange sits under the toilet and must be accessed directly to be repaired.
-
-
What's the best flange for uneven floors?
-
Use a Set-Rite® kit with breakable spacers for uneven surfaces. Shims and jumbo wax rings can help level the toilet bowl.
-
-
What if my flange is below floor level?
-
Use flange spacers or a Set-Rite kit to raise the flange height. The wax ring must be properly compressed to seal the toilet base.
-
-
Do I need a wax ring after replacing a flange?
-
Yes. Always use a new wax ring or seal when removing a toilet. Wax rings cannot be reused.
-