< Back to Project Guides
Project Guide
How to Install Secondary Venting Systems – Air Admittance Valves (AAV) Installation
Difficulty
intermediate

Time
< 2 hours

An Air Admittance Valve (AAV) is a one-way mechanical valve installed at plumbing fixtures to provide proper venting without connecting to a traditional vent stack. Installing an AAV involves confirming local code compliance, positioning the valve at least 4 inches above the horizontal branch drain, and securing it vertically within 15 degrees for optimal performance. This guide provides complete installation instructions for both DIY homeowners and professional plumbers.
What You'll Need For This Project
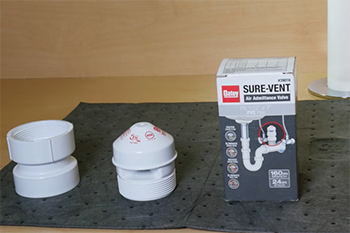
- Oatey Sure Vent AAV
- Measuring tape
- Plastic pipe cutter
- Oatey Thread Seal Tape
- If working with ABS: Oatey® ABS Medium-Bodied Black Cement and Oatey® Clear Cleaner
- If working with PVC: Oatey® Regular Clear PVC Cement and Oatey® Purple Primer
Confirm Local Code Compliance and Identify the Proper Installation Spot
Prepare the AAV for Installation
Measure the AAV Installation Height from the Branch Drain
Measure and Cut the Pipe for AAV Installation
Attach the Pipe to the AAV Adaptor
Install the AAV into the Adaptor
Check for Leaks After AAV Installation
Step 1. Confirm Local Code Compliance and Identify the Proper Installation Spot
First, check with your local municipality before installing to confirm the AAV will be approved for your application.
The AAV must be located in a position that meets these criteria:
- Within the maximum developed length permitted for the vent
- A minimum of 4 inches above the horizontal branch drain
- 6 inches above any insulation material
- Within 15 degrees of vertical
Step 2. Prepare the AAV for Installation
Remove the protective plastic film from the AAV before installation. Be sure to use directional fittings when installing the drains and AAV extension to ensure proper flow direction.
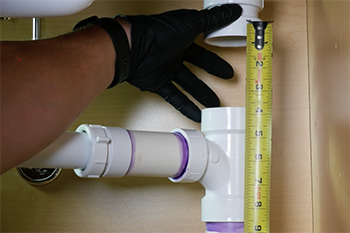
Step 3. Measure the AAV Installation Height from the Branch Drain
Ensure the AAV will be located a minimum of 4 inches above the horizontal branch it is serving. Use a measuring tape to verify the exact distance from the branch drain to your planned AAV location.
Critical installation note: AAVs must be installed vertically and must remain accessible for inspection and service throughout the life of the plumbing system.
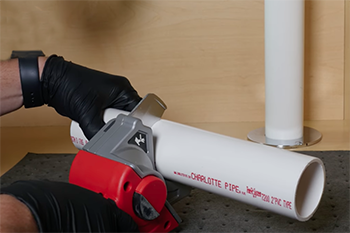
Step 4. Measure and Cut the Pipe for AAV Installation
Measure and cut the pipe using a plastic pipe cutter for clean, straight cuts. After cutting, chamfer and deburr the pipe end to ensure a strong, leak-free connection.
Why proper pipe preparation matters: Chamfering removes sharp edges that could scrape away cement during insertion, while deburring ensures the pipe seats fully in the fitting.
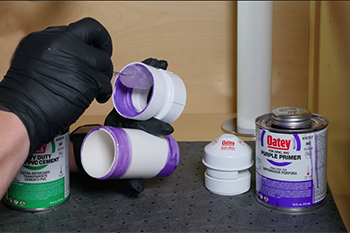
Step 5. Attach the Pipe to the AAV Adaptor
Solvent weld the pipe into the provided adaptor using the appropriate cement for your pipe material.
Cement selection based on pipe type:
- For ABS pipe: Use Oatey® ABS Medium-Bodied Black Cement and Oatey® Clear Cleaner
- For PVC pipe: Use Oatey® Regular Clear PVC Cement and Oatey® Purple Primer
Apply primer first, then cement, and immediately insert the pipe with a quarter-turn twist to distribute the cement evenly.
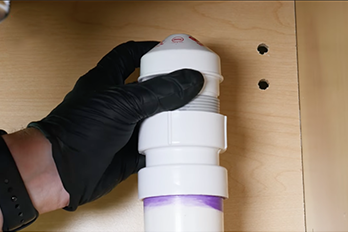
Step 6. Install the AAV into the Adaptor
Wrap thread seal tape around the AAV threads, wrapping in a clockwise direction around the male threads. Install the AAV into the adaptor by threading it clockwise until hand-tight.
Thread tape application tip: Start the tape at the end of the threads and wrap toward the base, overlapping by half the tape width for complete coverage.
Step 7. Check for Leaks After AAV Installation
If the AAV is installed under a sink, check for leaks by filling the sink completely and then draining it while observing all connections.
What to look for during leak testing:
- Water dripping from threaded connections
- Moisture around solvent-welded joints
- Slow drainage indicating improper venting
- Gurgling sounds that suggest inadequate air admittance
When Should You Use an Air Admittance Valve?
Air Admittance Valves are ideal for situations where traditional vent pipe installation is impractical or impossible.Common applications include:
- Kitchen island sinks where running vent pipes through cabinets is difficult
- Bathroom remodels in existing homes without accessible vent stacks
- Basement plumbing additions where extending vent pipes to the roof is costly
- Commercial spaces with complex layouts requiring localized venting solutions
- Retrofit projects where building codes permit AAV use as vent alternatives
AAV Installation Requirements: What Building Codes Require
Before installing an AAV, verify that your local building code permits their use. AAV installation must meet these specific requirements:
Location requirements for proper AAV installation:
- Within the maximum developed length permitted for the vent system
- A minimum of 4 inches above the horizontal branch drain
- At least 6 inches above any insulation material
- Within 15 degrees of vertical orientation
- In an accessible location for future inspection and service
Important: Always check with your local municipality before installation to confirm AAV approval in your area.
How to Tell if an Air Admittance Valve is Working Properly
To test if an AAV is functioning correctly, remove the valve and shake it vigorously—you should hear the internal diaphragm rattling. If you hear no noise, the AAV may have failed in the closed position and needs replacement.
Signs that your AAV has failed:
- Smelling sewer gas near the fixture (indicates failure in the open position)
- Slow drainage from the fixture
- Gurgling sounds when water drains
- No rattling sound when the valve is shaken
- Visible damage or cracks in the valve body
Benefits of Using Air Admittance Valves in Plumbing Systems
Air Admittance Valves offer significant advantages over traditional vent pipe installations:
- Cost savings: Eliminates the need to run vent pipes through walls, ceilings, and roofs
- Installation flexibility: Allows plumbing fixtures in locations where traditional venting is impractical
- Reduced labor: Significantly decreases installation time compared to conventional vent pipe routing
- Prevents sewer gas: One-way valve design prevents sewer gases from entering living spaces
- Maintains proper drainage: Provides necessary air intake for optimal drain flow and pressure balance
- Retrofit-friendly: Ideal solution for adding fixtures in existing buildings without accessible vent stacks
Common AAV Installation Mistakes to Avoid
Installing an AAV incorrectly can lead to drainage problems and code violations. Avoid these common mistakes:
- Installing the AAV below the horizontal drain line (must be at least 4 inches above)
- Positioning the AAV at an angle greater than 15 degrees from vertical
- Failing to verify local code approval before installation
- Installing in an inaccessible location that prevents future service
- Using the wrong cement type for your pipe material
- Over-tightening threaded connections, which can crack the valve body
- Installing below insulation level in attic or crawl space applications
Published on May 22, 2026
Frequently Asked Questions
-
What is an air admittance valve used for?
-
An air admittance valve (AAV) is used to provide proper venting for plumbing fixtures without connecting to a traditional vent stack. AAVs allow air to enter the drain system when water flows, preventing vacuum conditions while blocking sewer gases from escaping into living spaces.
-
-
Where should an air admittance valve be installed?
-
An air admittance valve should be installed at least 4 inches above the horizontal branch drain, at least 6 inches above any insulation, and within 15 degrees of vertical. The AAV must be located in an accessible area for future inspection and service.
-
-
Do I need a permit to install an air admittance valve?
-
Permit requirements vary by location. Always check with your local building department before installing an AAV, as some jurisdictions restrict or prohibit their use. Many areas require permits for any plumbing work, including AAV installation.
-
-
Can an air admittance valve be installed horizontally?
-
No, air admittance valves must be installed vertically, within 15 degrees of true vertical. Horizontal installation prevents the internal diaphragm from operating correctly and will cause the valve to fail.
-
-
How long do air admittance valves last?
-
Air admittance valves typically last 20-30 years under normal conditions. However, lifespan depends on water quality, usage frequency, and proper installation. Regular inspection every few years helps identify failing valves before they cause problems.
-