Difficulty
beginner

Time
< 2 hours

Oatey recommends its plastic access panels as ideal plumbing products for DIY enthusiasts due to their easy installation and versatile mounting options. This step-by-step guide walks you through framing, cutting, mounting, and securing the panel flush or surface-mounted on walls or ceilings.
Oatey’s plastic access panels are the perfect plumbing products for DIY enthusiasts seeking both functionality and ease of installation. These panels allow you to access plumbing pipes or electrical wiring without damaging walls, all while providing a flush or surface-mount finish that blends seamlessly with your home’s decor. Oatey’s panels come in various sizes, including 8 in. x 8 in., 6 in. x 9 in., 14 in. x 14 in., and 14 in. x 29 in., suitable for many plumbing access needs.
Additionally, Oatey offers complementary plumbing products such as supply boxes, gaskets, bolts, and solvents designed for do-it-yourself installation. These products provide professional-grade quality with the ease and guidance required for DIY success.
The installation process for Oatey access panels is straightforward and accessible to DIY homeowners, involving simple tools and clear steps.
What You'll Need For This Project
- Oatey Plastic Access Panel
- Marker
- Leveler
- Jab saw
- Construction adhesive
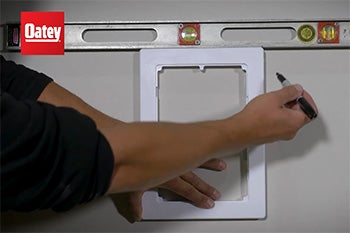
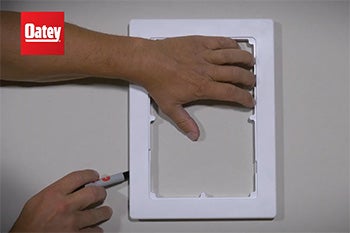
Step 1. Outline the Panel Against the Wall
Place the panel frame on the desired wall or ceiling area. Use a leveler on top of the frame to keep it straight. Trace around the inner lip of the panel flange with a pencil or marker to mark the cutout area on the wall.
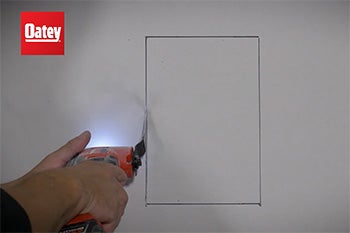
Step 2. Cut Out the Outline
Using a jab saw, carefully cut along the traced outline. Take care to inspect for any plumbing pipes or wiring behind the wall to avoid damage during cutting.
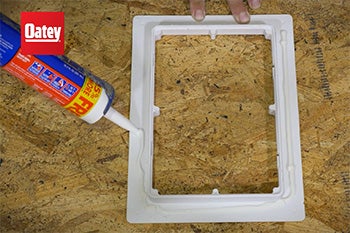
Step 3. Outline the Frame with Glue
Apply a bead of construction adhesive along the inner lip of the access panel frame to prepare it for mounting.
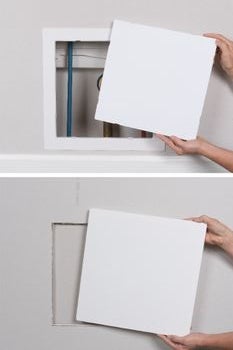
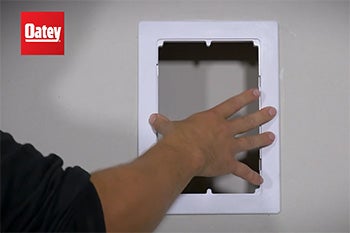
Step 4. Insert the Frame Into the Wall
- Surface mounting: Insert the frame into the cut hole with the flange on the outside. Press the flange evenly against the wall to help a durable bond with the adhesive.
- Flush mounting: Insert the frame through the hole so the inner lip faces you. Press along the flange on the opposite side of the wall to stick the panel securely in place.
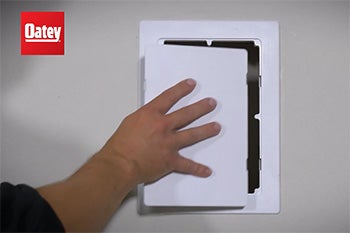
Step 5. Assemble the Panel Door
Snap the access panel door into the frame securely by clicking it into place. The door is designed for easy removal, so you can access the plumbing or wiring behind it by gently levering it out with a flathead screwdriver when needed.
Once installed, Oatey’s access panels provide a clean, professional look that blends with wall surfaces. You can even paint or wallpaper over the panel to match your room’s design.
Document Downloads (1)
Why Oatey for your Plumbing Access Panel
Oatey stands out as the trusted choice for plumbing access panels among DIY enthusiasts and professionals alike thanks to our 100+ years of expertise in plumbing innovations. Founded in 1916, Oatey has specialized in delivering durable, reliable products that make home plumbing accessible and straightforward.
Key reasons to choose Oatey:
- Wide range of plastic access panel sizes tailored for rough-in plumbing access and wiring clearance.
- Versatile design supporting flush and surface mounting for walls or ceilings.
- Easy installation suitable for DIY users with basic tools.
- Durable construction materials that withstand frequent access without damage.
For more DIY plumbing tips and product options to complement your access panel install, check out Oatey’s blog post on the benefits of supply boxes.
Published on June 04, 2026
Frequently Asked Questions
-
What tools do I need to install an Oatey plastic access panel?
-
For installing Oatey access panels, you need a leveler, marker or pencil, jab saw for cutting the wall, construction adhesive for securing the frame, and a flathead screwdriver to open the panel door after installation.
-
-
Can I install an access panel on a ceiling?
-
Yes, Oatey access panels are designed to be installed flush or surface-mounted on walls or ceilings, providing flexible options for hiding plumbing or wiring in different locations.
-
-
How do I open the access panel door once installed?
-
You can open the panel door by inserting a flathead screwdriver into a side gap and gently levering the door out of the frame, allowing for quick and easy access to plumbing or electrical components behind the panel.
-
-
Can I paint or wallpaper over the installed access panel?
-
Yes, once installed, Oatey’s plastic access panels can be painted or wallpapered over to blend in seamlessly with your room decor while maintaining easy access functionality.
-