How to Install a ShowerLine Linear Shower Drain System: A Stylish and Functional Transformation


Installing a Linear Shower Drain System is a stylish and functional transformation that can take your shower space to the next level. The QuickDrain ShowerLine featured in this installation guide provides a sleek, low-profile aesthetic and easier water flow without compromising the overall shower experience. Not only does this create a spacious, uninterrupted feel for showering, but it also makes cleaning a breeze by eliminating hard-to-reach corners where dirt and grime can accumulate. In this step-by-step tutorial, we will go through the entire ShowerLine installation process from start to finish
What You'll Need For This Project
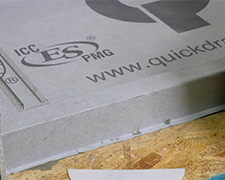
- QuickDrain Showerline System
- Tape measure
- Pen or marker
- Grinder or bandsaw
- ¼ in. X 3/8 in. square-notch trowel
- Modified or rapid set thinset
- Drill
- Oatey Primer and Oatey PVC Cement
- 2 in. #8 water resistant screws or (for concrete sub-floor) #8 1-5/8 in. screws
- Speed square
- Scissors
- Hercules Multi-Purpose Jobsite Wipes
- Plastic drywall knife
- Oatey Silicone Sealant
- File
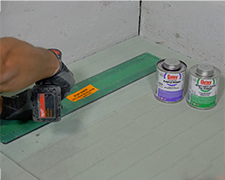
Step 1. Ensure floor is level and up to TCNA Standards
Before you begin, ensure the floor is level and up to TCNA (Title Council of North American) Standards.
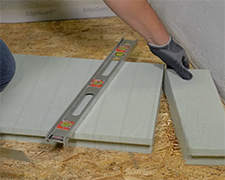
Step 2. Measure and mark dimensions
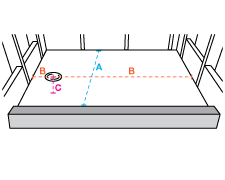
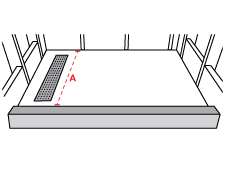
Measure the overall width taken from one sidewall to the other. Measure and mark the dimensions taken from the rear wall to the inside face of the curb (A).
Note: Write down these measurements to reference later.
Next, measure the distance to the center of the vertical drainpipe from (1) the side wall and (2) the rear wall of the shower footprint (B). Also measure the depth of the drain (C). Record these measurements.
Note: The height of the vertical drainpipe should be 1-¼ in. below the top of the subfloor when solvent welding.
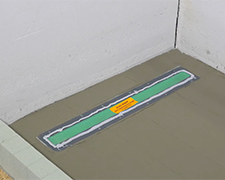
Step 3. Cut drain support frame
Using the measurements taken above, cut the drain support frame to size.
Next, measure the distance from the back wall of the shower to the drain support frame (A). This is the length noted in the next sentence.
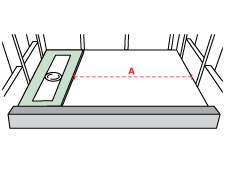
Cut the slope panels to length and then final width. Find this length by referencing your measurements taken in Step 2. Cut the curb last, referencing those same measurements.
Finally, dry fit all panels in the shower pan area and adjust if necessary.
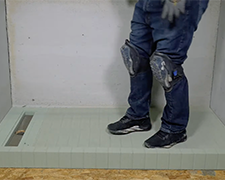
Step 4. Remove dry fit panels
Begin by removing the dry fit panels from the shower pan area. Ensure the shower area is free from all debris.
Step 5. Install Quick Slope panels
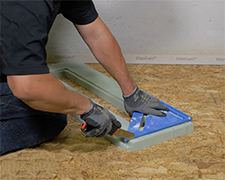
Next, using a ¼ in. X 3/8 in. square-notch trowel, spread a layer of modified or rapid-set thinset over the shower footprint.

Position the drain support frame and press firmly into the thinset, ensuring full coverage. Next, position the curb and press firmly into the thinset.
Then, position the front and rear Quick Slope panels and press firmly into the thinset.
Note: To ensure the panels have been evenly compressed, carefully walk on them to achieve full coverage of thinset.
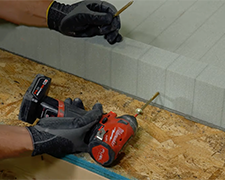
Step 6. Secure curb
Using a drill, secure the curb with supplied curb lags. Ensure you do not screw into the drain body. Then, remove any excess thinset that may have seeped out from under the PET pan system.
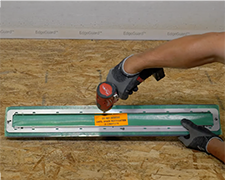
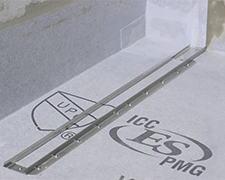
Step 7. Remove clamping collar
Begin by cutting the masking tape around the inside of the clamping collar. Then, remove the clamping collar, saving the screws for future steps.
Step 8. Solvent cement coupling into drain body
Next, solvent cement coupling onto the drain body using Oatey Primer and Oatey PVC Cement.
Disclaimer: You can also use approved two-band coupling. For proper solvent cement technique, view our training video here.
Then, solvent cement the drain to the vertical drainpipe in the drain support frame.
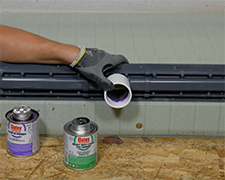
Finally, secure the drain body using #8 rust-proof screws in holes provided on the outside edge of the drain body.
Disclaimer: For wood sub-floor, secure drain body with 2 in. #8 water resistant screws. For concrete sub-floor, use #8 1-5/8 in. screws to fasten into PET.
Step 9. Measure, mark, and cut sheet waterproofing
Begin by measuring the depth, width and the inside rise on both ends of the curb. Be sure to record these dimensions.

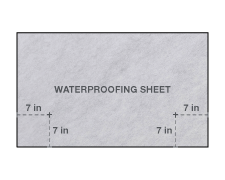
Next, mark one of the back corners 7 in. from both outside edges.
Then, using a speed square, mark the two corners, creating a square. Next, measure the shower width from the inside edge of your first corner, and mark. Create a 7 in. square using that mark.
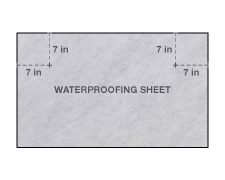
After you have marked your corners, cut the inside corner and fold to create a flap.
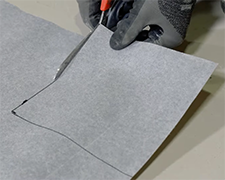

Step 10. Measure and mark corners
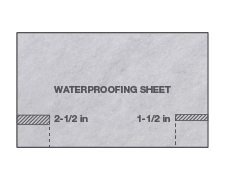
For the curbside corners, measure the inside shower depth and then mark 7 in. from the outside edge. Then, using a speed square, outline your front corners.
Measure 2-½ in. from your inside line to the edge and mark the corner with a straight edge (A). This is the rise of the curb on the inside of the shower on the drain side. ‘X’ out this section and cut it out from the sheet waterproofing.
Next, measure the shower width from your first corner inside line, and mark with a straight edge (B). After marking, measure in 1-½ in., then ‘X’ out this section and cut it out from the sheet waterproofing.
Note: This is the interior rise, located at the opposite end of the curb.
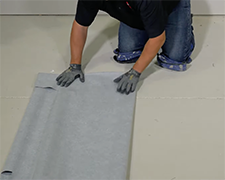
Finally, fold in the edges of your sheet waterproofing, leaving 7 in. that will fold up the wall. Fold waterproofing towards the drain side. This will be the first corner to be installed.
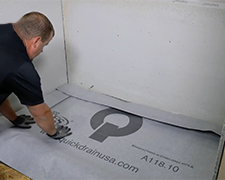
Step 11. Begin to install waterproofing by applying thinset over panels
Use a 3/16 in. V-notched trowel to spread a second layer of modified or rapid set thinset over the foam panels and slightly over the edges of the drain body.
Note: Ensure coverage up to the edge of the drain body.
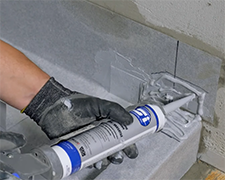
Step 12. Remove tape and apply sealant on flange
Remove outer masking tape from the drain flange. Clean the drain flange using Hercules Multi-Purpose Jobsite Wipes.
Note: May use acetone or Goof Off to clean residue as well.
Next, apply a 3/16 in. of sealant on exposed drain flange about 3/8 in. from the trough.
Lay the folded waterproofing sheet over the drain area. Then, unfold to ensure that the topical sheet waterproofing is square. Smooth the membrane over the drain body and push locator pins through the membrane.
Step 13. Install clamping collar
Install the clamping collar by aligning the locator pins with the corresponding holes in the clamping collar. Using a drill, secure with screws in an alternating pattern.
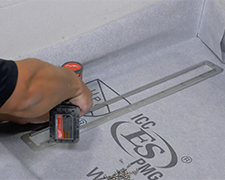
Using a plastic drywall knife, smooth the membrane throughout the shower footprint to remove excess thinset and any air pockets.
Step 14. Apply thinset to side walls and install sheet membrane
Using the 3/16 in. V-notched trowel, spread thinset 7 in. up all side walls and behind the corner flap.
Note: Do one side at a time to keep thinset from drying out.
Press and smooth the sheet membrane into corners and up the wall immediately after the thinset application.
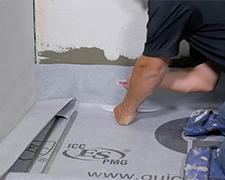
Then, using the 3/16 in. V-notched trowel, apply thinset to the top and sides of the curb. Press and smooth the sheet membrane around all sides of the curb.
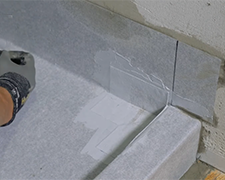
Step 15. Install corners, starting with back inside corners
Begin by outlining the back inside corners with a marker. Next, apply sealant to the ridges, valleys, perimeter and field of inside corners.
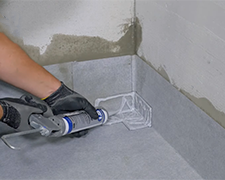
Press the preformed corners into position. Use even pressure so the sealant spreads evenly between the corner and sheet membrane. Then, smooth the squeeze along all edges, leaving no visible gaps.
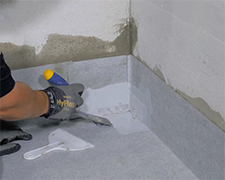
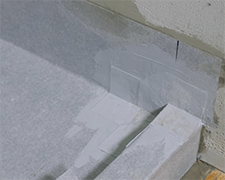
Step 16. Install front inside corners
For the inside corner of the curb, begin by outlining the corner on the waterproofing and where the top edge overlaps the top of the curb.
Remove the overlapping material. Apply sealant to the ridges, valleys, perimeter and field of the inside corner.
Press the preformed corner into position. Use even pressure so the sealant spreads evenly between the corner and sheet membrane. Then, smooth the squeeze out along all edges, leaving no visible gaps.
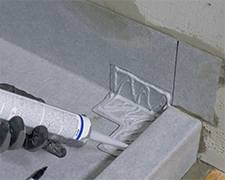
Step 17. Install curb covers to outside corner
Dry fit and mark the outside corner. Be sure to cut it to the size needed to lap the inside corner down to the pan.
Apply sealant to the ridges, valleys, perimeter and field of the outside corner. Press the curb covers into position. Use even pressure to the sealant spreads evenly between the corner and sheet membrane. Smooth the squeeze out along all edges leaving no visible gaps.
Step 18. Measure and cut trough extensions
Measure the length from the screw hole in the end of the clamping collar. Next, using measurements, use a grinder or bandsaw to cut extensions 1/8 of an inch shorter than overall length to not damage the waterproofing. Using a file, remove any sharp edges.
Step 19. Install extensions and channel covers
Lay a bead of sealant on the waterproofing and set the extension in place. Install extensions to clamp the collar with a stainless-steel screw.
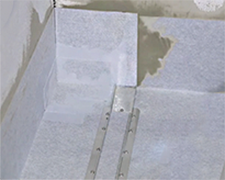
Measure the distance between the wall to the curb and subtract ¼ in. from the total length.
Then, using a grinder, cut the channel covers to length and round off the edges. This will minimize the chance of damaging the waterproofing. Finally, install channel collars onto clamping collar and extensions.
Published on January 23, 2024