Difficulty
beginner

Time
< 2 hours

This guide reflects best practices used by professional plumbers and supported by Oatey’s decades of plumbing product expertise.
Removing and reapplying caulk is a simple 7-step DIY project, but plan for about 24 hours start to finish so the new bead can fully cure. The basic process involves cutting and removing the old bead, cleaning the joint, preparing the surface, applying a new bead, smoothing it, and allowing the caulk to cure.
Not sure which caulk to use? See our guide: How to Choose the Right Caulk or Sealant
What You'll Need For This Project
- Putty knife (plastic for delicate surfaces) or razor scraper – to remove old caulk
- Utility knife – to score edges and cut the nozzle
- Rags or paper towels – for cleanup
- Rubbing alcohol (isopropyl alcohol) – to remove residue and improve adhesion
- Disinfecting cleaner (bathroom/kitchen-safe) – to remove soap scum and grime
- Painter’s tape – for crisp, straight caulk lines (optional but helpful)
- Caulking gun – for smooth, controlled application
- New caulk (e.g., Oatey® Hercules® Plumbers Caulk or a bathroom/kitchen-rated silicone)
- Caulk smoothing tool (or a gloved finger) – for a professional finish
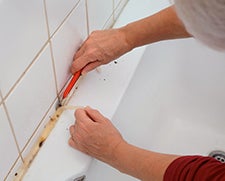
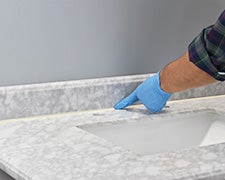
Step 1. Cut and Remove the Old Caulk
If you have old or moldy caulk, follow Steps 1-2 for how to remove caulking. If you are starting fresh, skip to Step 3.
Use a utility knife to score along both edges of the caulk bead where it meets the surface. Then:
- Slide a putty knife or razor scraper under the bead
- Lift and peel away as much caulk as possible
- Continue scraping until you remove all visible material
Tip: Work slowly to avoid scratching tubs, tile, fiberglass surrounds, or countertop finishes.
Step 2. Remove Residue So New Caulk Can Bond
Even small remnants can prevent adhesion.
- Dampen a rag with rubbing alcohol
- Wipe the entire joint/seam thoroughly
- Scrape any remaining bits and wipe again until the surface is clean
Important: New caulk won’t stick reliably to old caulk residue. Thorough removal is the difference between a long-lasting seal and a bead that peels.
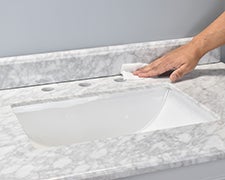
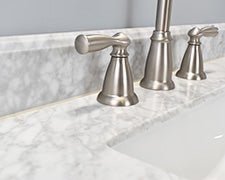
Step 3. Prep the Area Completely
Before applying new caulk, remove anything that can interfere with bonding:
- Clean away soap scum, oils, grime, and mildew
- Rinse if needed and wipe dry
- Let the area air-dry completely
Do not caulk over moisture. Trapped water can lead to poor adhesion and mold.
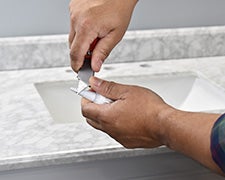
Step 4. Cut the Nozzle for the Right Bead Size
Cut the caulk tube tip:
- At a 45-degree angle
- With an opening sized to your joint (often around 1/8 inch, but match the gap)
Puncture the inner seal (if your tube has one), load it into the caulk gun, and test on scrap cardboard to confirm bead size and flow.
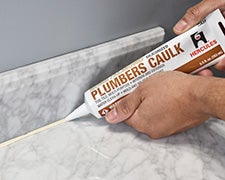
Step 5. Apply a Steady, Continuous Bead of Caulk
For the cleanest seal, aim for one continuous pass per section.
- Hold the nozzle at a 45-degree angle
- Keep the tip in contact with the joint
- Use both hands with the caulking gun (dominant hand on trigger).
- Squeeze the trigger with steady pressure
- Move at a consistent speed to fill the gap evenly
Vertical seams: Apply caulk top to bottom to reduce sagging.
Tip: It’s better to apply a slightly smaller bead than a huge bead you’ll have to remove.
Step 6. Smooth the Caulk
Immediately smooth the bead before it skins over:
- Use a caulk finishing tool or a lightly dampened (or gloved) finger
- Apply light, consistent pressure to push caulk into the joint
- Wipe your tool frequently as you go
If you used painter’s tape, remove it while the caulk is still wet for the sharpest lines.
Step 7. Wait Until the Caulk has Cured
Cure time depends on product type and conditions (humidity/temperature), but typical guidance is:
- At least 8 hours before water exposure
- About 24 hours for full cure
Always follow the specific cure time on your caulk label for best results.
Key Takeaways: Remove and Reapply Caulk the Right Way
- Remove all old caulk: New caulk won’t bond to leftover material
- Clean and dry thoroughly: Adhesion depends on a clean, moisture-free surface
- Apply a steady bead and smooth right away: This creates a tight, professional seal
- Respect cure times: Avoid water exposure until the caulk has cured per the label
- Use the right product: Choose a bathroom/kitchen caulk designed for wet environments
With these steps, you’ll get a clean-looking bead and a long-lasting, watertight seal that protects your tub, sink, countertop, and surrounding surfaces.
Published on June 04, 2026
Frequently Asked Questions
-
How do you remove old caulk from a bathtub?
-
Score both sides of the bead with a utility knife, then scrape and peel the caulk using a putty knife or razor scraper. Finish by wiping the area with rubbing alcohol to remove residue.
-
-
Can you apply new caulk over old caulk?
-
No. Caulking over old caulk usually fails because the new bead won’t adhere properly—leading to peeling, leaks, and mold. Remove old caulk completely first.
-
-
What’s the best way to apply caulk smoothly?
-
Cut the nozzle at a 45-degree angle, apply a steady bead, then smooth immediately with a caulk tool (or finger) in one continuous pass. Work in short sections and clean your tool often.
-
-
How long before I can use the shower after caulking?
-
Many products need at least 8 hours before getting wet and around 24 hours to fully cure. Check your product label to confirm.
-
-
How often should bathroom caulk be replaced?
-
Typically every 3–5 years, or sooner if you notice cracking, gaps, peeling, discoloration, or mold.
-